In an era when AI writes both application code and test code, E2E tests that interact with the UI need to do more than pass. It is also important that readers can understand what the test is interacting with.
AI-generated UI test code may appear to work, but it can depend on order or visible text in a way that makes its intent unclear when read later.
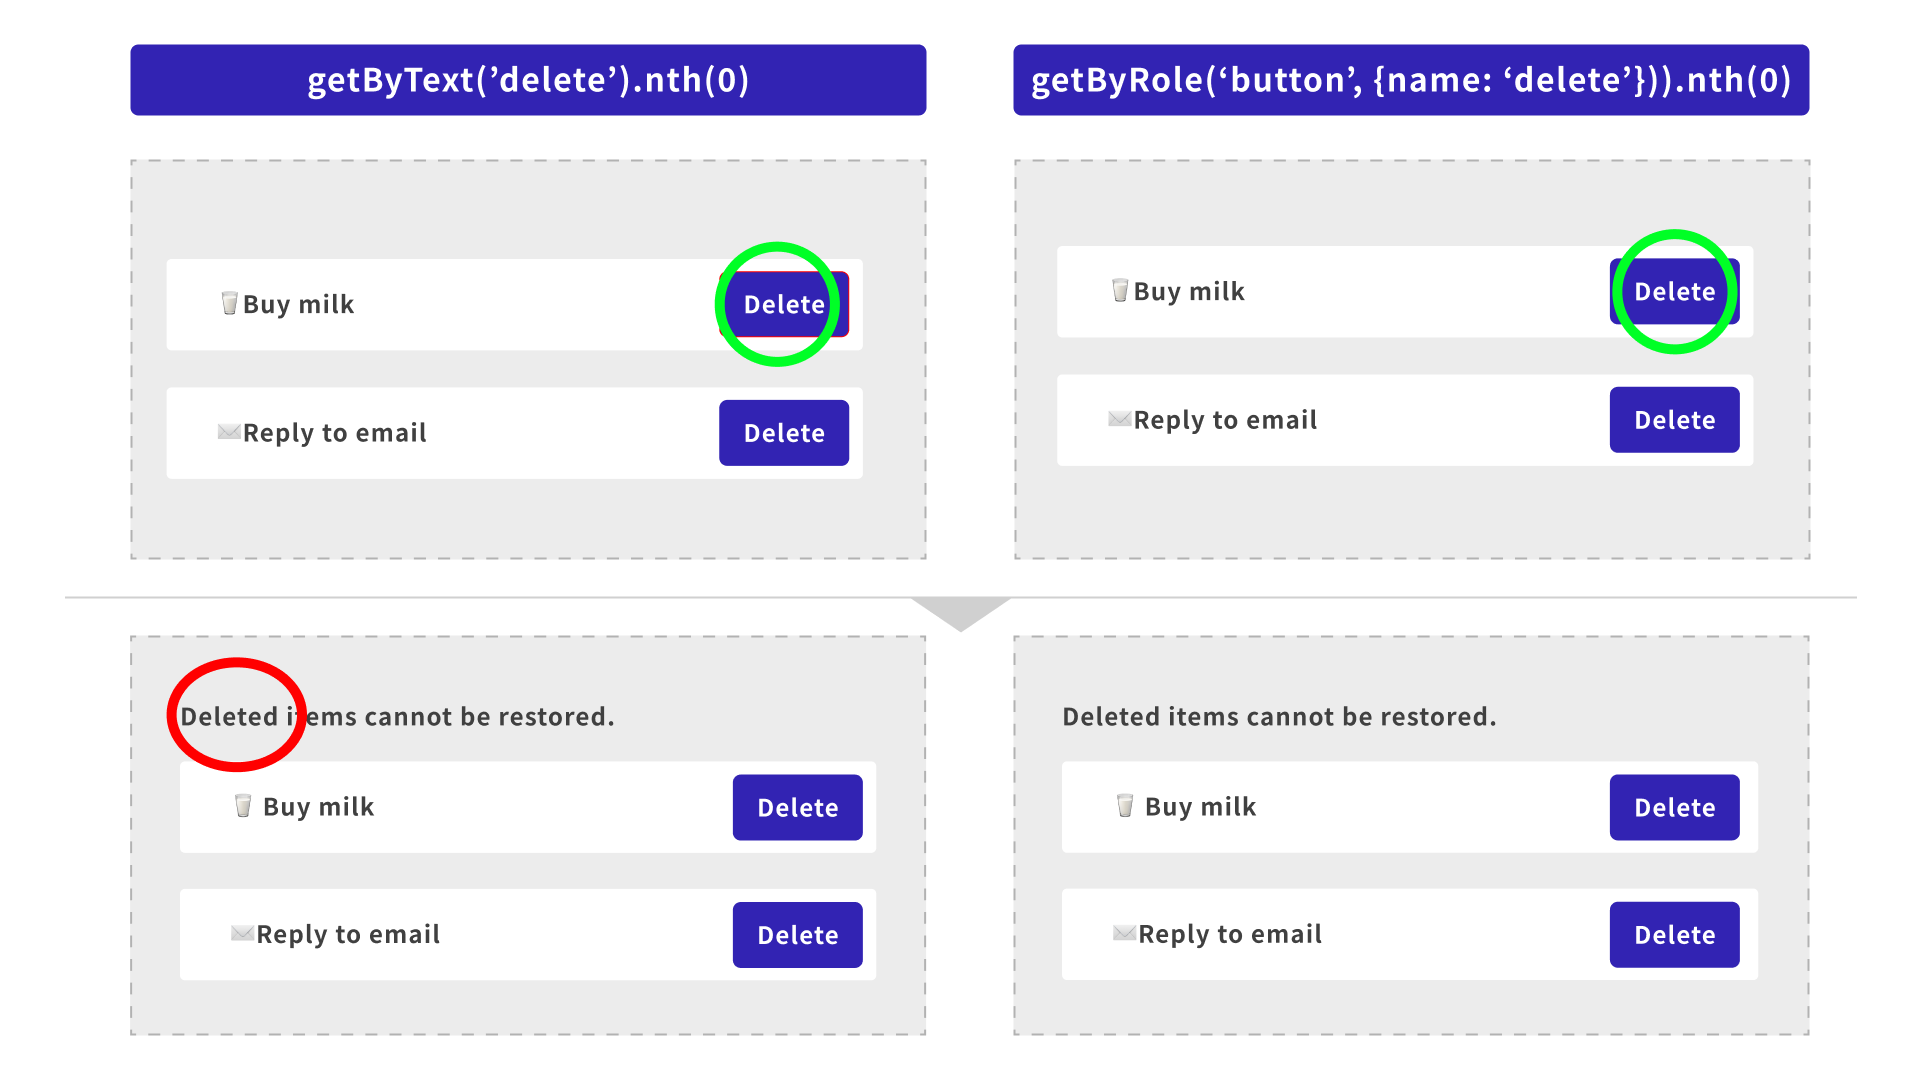
// Click the first "Delete" element
await page.getByText('Delete').nth(0).click();
For example, the test code above hard-codes the first “Delete” element with nth(0). It may pass for now, but if more buttons are added or the order changes, it may interact with an unintended element.
This article introduces how to get elements in Playwright using Locators by specifying the role, name, and area that users recognize, rather than relying only on order or strings. By using roles, labels, and areas separated by headings, test code becomes easier to read because it clearly shows which element is being operated, and it becomes more resilient to UI changes.
The code examples use Playwright, but the same idea applies when testing UI with Testing Library in environments such as Jest or Vitest: specify elements by role or label. Read the examples while adapting them to the tool you use.
For Playwright basics, see the article Playwright E2E testing for frontend developers, part 1 - setup and basic tests.
Sample TODO list
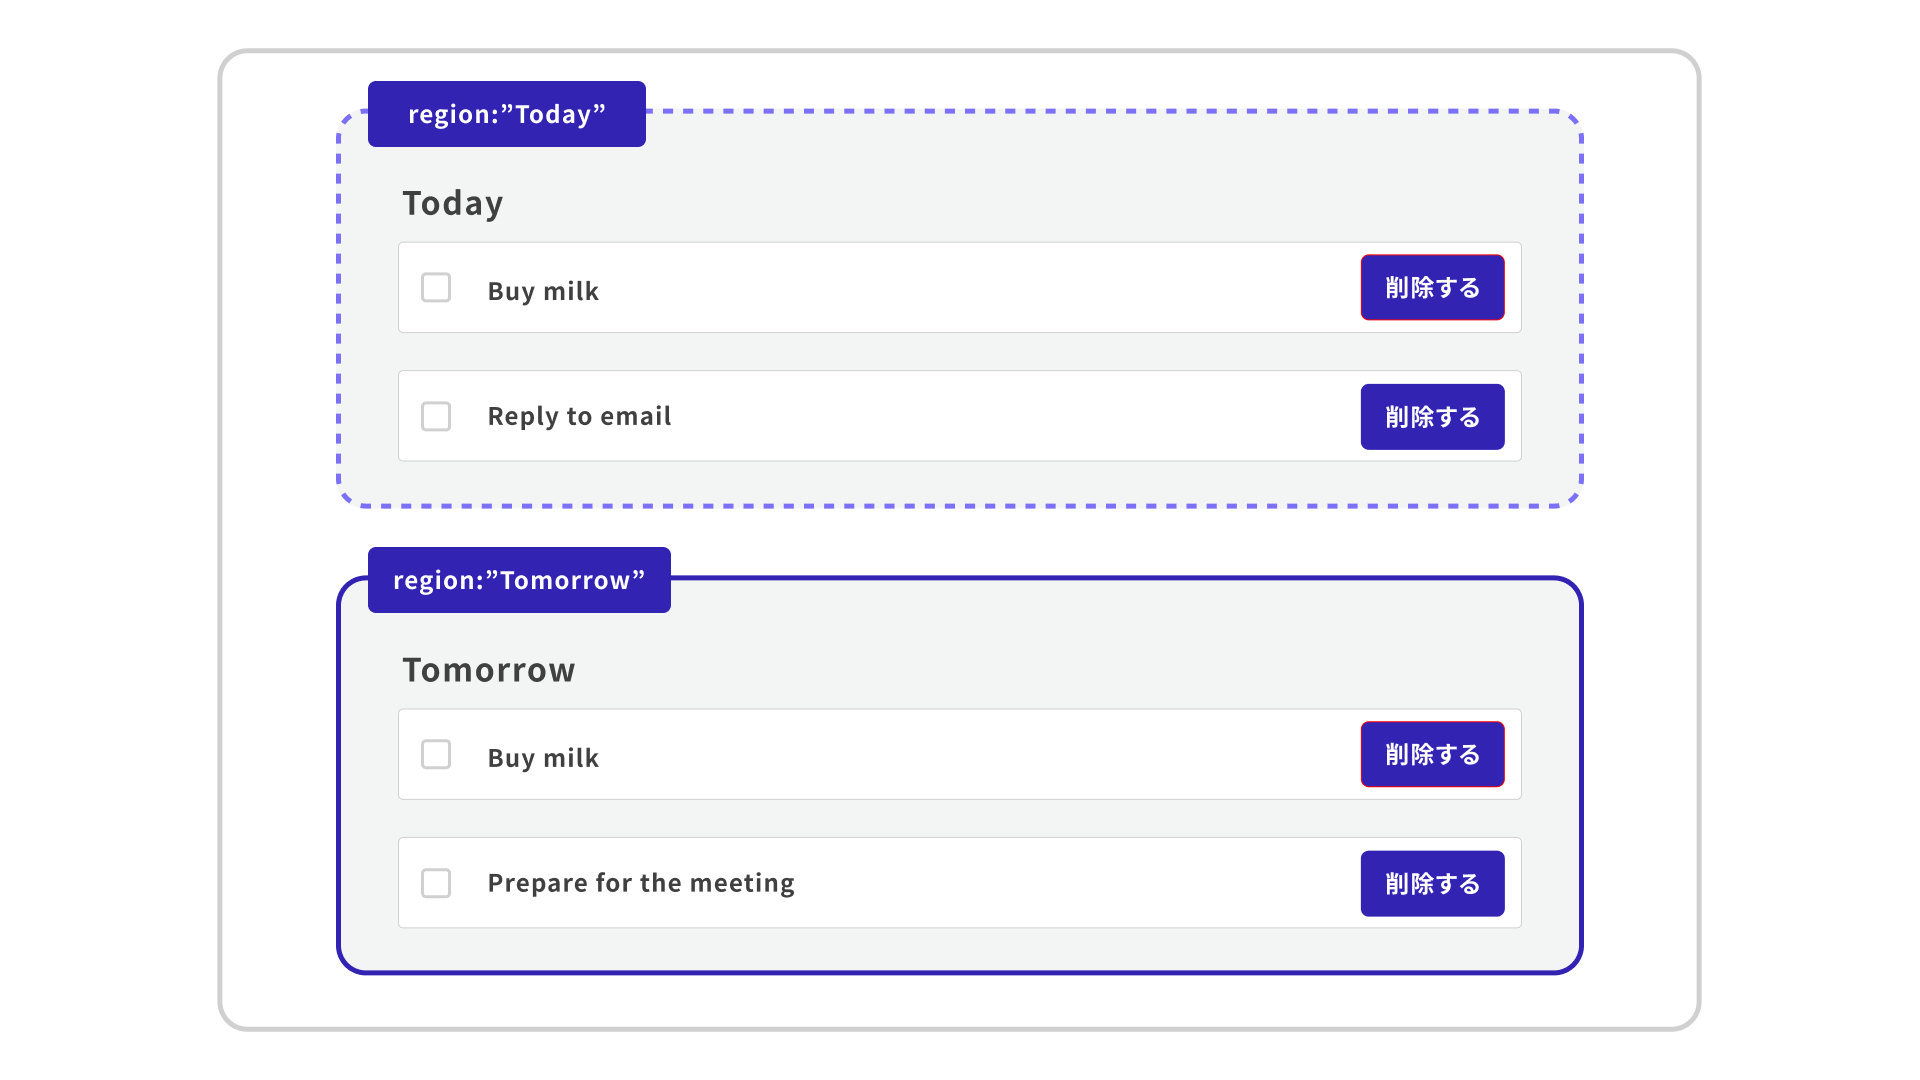
The sample has two areas, “Today” and “Tomorrow”, and both contain “Buy milk”. When a TODO item is deleted, a confirmation dialog opens, where the deletion is confirmed.
In this demo, the click itself succeeds, but with nth(0) it is not clear from the test code which TODO item is being targeted.
Get buttons by role and name
A role represents what an element does on the screen, such as a button, heading, or input field. The name is the name used by users and screen readers to identify that element, also known as its accessible name. For example, <button>Delete</button> can be treated as an element whose role is button and whose name is “Delete”.
When operating a button in Playwright, use the getByRole() method to specify the role and pass the accessible name to name. If you search only by text with getByText(), text other than the button text, such as the following “Delete” text, can also become a candidate.
<p>Before selecting Delete, check the contents.</p>
<button type="button">Delete</button>
// Bad: also matches "Delete" in the note
await page.getByText('Delete').click();
// Good: limits the target to buttons. The name is the accessible name.
await page.getByRole('button', {name: 'Delete'}).click();
Get input fields by label
The same approach applies not only to buttons but also to input fields.
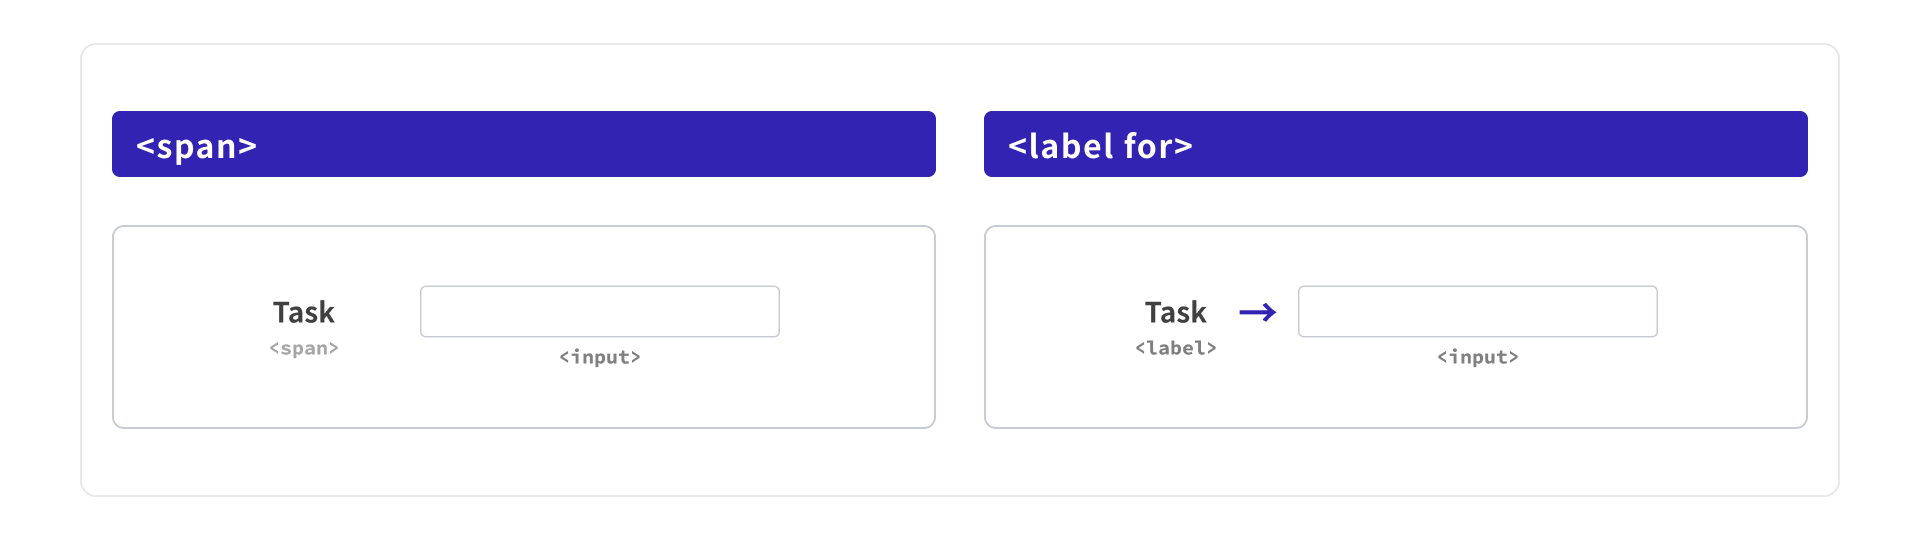
Even if something looks like a label, leaving it as a <span> tag does not associate it with the <input> tag. As a result, the test code tends to rely on class names or the data-testid attribute, which is often used as a test-only marker.
<!-- Bad: looks like a label, but is not associated with the input -->
<span class="todo-label">Task</span>
<input class="todo-input" type="text" />
If you replace the <span> with a <label> tag and associate it using for and id, you can get the input field by the name that users see: “Task”. In Playwright, it can be retrieved with getByLabel('Task'). This is not only a change for test code. It is also HTML that communicates the meaning of the input field to assistive technologies such as screen readers.
data-testid is not bad in itself. However, if an element can be retrieved by a label or role that users can recognize, prioritize that first. Using cues that match the meaning of the screen is better than adding markers only for test code, and it also leads to better HTML.
<!-- Good: the label and input are associated -->
<label for="todo-input" class="todo-label">Task</label>
<input id="todo-input" class="todo-input" type="text" />
When the semantics are correct, you can get elements by role or label and then write operations and assertions directly. Additional input can be entered with the fill() method, and the entered value can be checked with the toHaveValue() method.
For details on how to write the for attribute on the <label> tag, see the article 17 HTML and CSS tips for better links, buttons, and forms.
await page.getByLabel('Task').fill('Reply to email');
await expect(page.getByLabel('Task')).toHaveValue('Reply to email');
await page.getByRole('button', {name: 'Add'}).click();
await expect(page.getByRole('listitem').filter({hasText: 'Reply to email'})).toBeVisible();
The patterns can be summarized as follows.
| Cue | Playwright example | Point |
|---|---|---|
| CSS class | page.locator('.todo-input') |
Depends on a name used for appearance and does not associate the label with the input field |
data-testid |
getByTestId('todo-input') |
An option when the element cannot be retrieved by a user-facing cue. The HTML can easily become markup written for test-code convenience |
Label + id |
getByLabel('Task') |
Retrieves the element by wording users recognize, and the semantics are correct. Recommended |
Use the <dialog> tag for dialogs
If you create a confirmation dialog only with a <div> tag and CSS, screen readers will not recognize it as a dialog, and test code cannot use the getByRole('dialog') method.
<!-- Bad: a div alone does not have the dialog role -->
<div class="modal-box">
  <h2>Confirm deletion</h2>
  <button type="button">Delete</button>
</div>
// Bad: may pick up a Delete button in the list
await page.getByText('Delete').first().click();
The <dialog> tag communicates the dialog role to the browser, so it can be retrieved with the getByRole('dialog') method. If you also associate it with a heading using aria-labelledby, the dialog gets the name “Confirm deletion”, allowing you to narrow the target with getByRole('dialog', {name: 'Confirm deletion'}). When displaying it, open it with showModal() so it is treated as a modal dialog.
For details on the <dialog> tag, see the article HTML dialog element for modal UIs.
<!-- Good: can be retrieved by the dialog role -->
<dialog aria-labelledby="dialog-title">
  <h2 id="dialog-title">Confirm deletion</h2>
  <button type="button">Delete</button>
</dialog>
// Good: scope the target to the dialog
const dialog = page.getByRole('dialog', {name: 'Confirm deletion'});
await dialog.getByRole('button', {name: 'Delete'}).click();
Scope elements with the same text to an area
When buttons with the same name appear in multiple places, searching the entire page does not communicate which TODO item is being targeted. Like the nth(0) example at the beginning, this hard-codes the order.
await page.getByText('Delete').nth(2).click();
If you specify aria-labelledby on a <section>, it is treated as an area with that heading as its name. For example, the “Tomorrow” heading is associated with the <section>, so test code can retrieve it as a meaningful area with getByRole('region', {name: 'Tomorrow'}).
<section aria-labelledby="tomorrow-heading">
  <h2 id="tomorrow-heading">Tomorrow</h2>
  <ul>
    <li>
      <label>
        <input type="checkbox" />
        <span>Buy milk</span>
      </label>
      <button type="button">Delete</button>
    </li>
  </ul>
</section>
const milk = page
  .getByRole('region', {name: 'Tomorrow'})
  .getByRole('listitem')
  .filter({hasText: 'Buy milk'});
await milk.getByRole('checkbox').check();
await expect(milk.getByRole('checkbox')).toBeChecked();
Use aria-label to distinguish buttons with identical visible text
First, narrow the target using region and listitem. Then, if there are multiple buttons with the same “Delete” text and you want to give assistive technologies a name that distinguishes them, use aria-label to supplement what the button deletes.
<button type="button">Delete</button>
<button type="button" aria-label="Delete: Buy milk">Delete</button>
const milk = page
  .getByRole('region', {name: 'Tomorrow'})
  .getByRole('listitem')
  .filter({hasText: 'Buy milk'});
// When aria-label is present, the name takes priority over the visible text
await milk.getByRole('button', {name: 'Delete: Buy milk'}).click();
This is unnecessary if the buttons can already be distinguished. For icon-only buttons, see the article 17 HTML and CSS tips for better links, buttons, and forms.
Combining these changes
So far, this article has covered how to get buttons, input fields, dialogs, and areas according to the meaning of the screen. In actual test code, these techniques are combined to narrow the target down to “which operation, on which TODO item, in which area”.
Adding an item can be expressed with a label, location with an area, the button name with aria-label, and confirmation with a dialog. The following E2E test checks the full “add, then delete” flow in the TODO list shown at the beginning of this article.
This E2E test does more than simply press the delete button. It checks the following three points.
- The added TODO item appears in the “Today” area
- Only “Buy milk” in the “Tomorrow” area is deleted
- “Buy milk” in the “Today” area remains, even though it has the same name
When you narrow the scope with roles and labels, this intent becomes readable from the test code. Written as code, it looks like this.
// 1. Add a TODO item: getByLabel('Task') + getByRole('button', {name: 'Add'})
await page.getByLabel('Task').fill('Reply to email');
await page.getByRole('button', {name: 'Add'}).click();
await expect(
  page.getByRole('region', {name: 'Today'}).getByRole('listitem').filter({hasText: 'Reply to email'}),
).toBeVisible();

// 2. Delete "Buy milk" in Tomorrow: region -> listitem -> button
const tomorrow = page.getByRole('region', {name: 'Tomorrow'});
const milk = tomorrow.getByRole('listitem').filter({hasText: 'Buy milk'});
await milk.getByRole('button', {name: 'Delete: Buy milk'}).click();

// 3. Confirm in the dialog: dialog -> button('Delete')
const dialog = page.getByRole('dialog', {name: 'Confirm deletion'});
await dialog.getByRole('button', {name: 'Delete'}).click();

// Verify the deletion result:
// the dialog closed, the neighboring TODO item was not affected,
// and the TODO item with the same name in Today remains.
await expect(dialog).toBeHidden();
await expect(tomorrow.getByRole('listitem').filter({hasText: 'Prepare for the meeting'})).toBeVisible();
await expect(milk).toHaveCount(0);
await expect(
  page.getByRole('region', {name: 'Today'}).getByRole('listitem').filter({hasText: 'Buy milk'}),
).toBeVisible();
Conclusion
HTML semantics improved for accessibility also become useful cues when writing test code.
This is not limited to E2E tests. When reviewing test code, check whether the target is hard-coded with nth() or CSS classes, and whether it can instead be retrieved using cues that users can recognize, such as roles, labels, and headings.