
ESLint is a tool that automatically checks JavaScript and TypeScript code for problems. It does more than keep formatting consistent: it can also catch code patterns that hint at bugs or may lead to runtime errors.
Frameworks such as Vite and Next.js sometimes install ESLint for you automatically. Even when it is already part of the setup, it is easy not to get much value from it because it is unclear which rules exist, what they are for, and when linting should run. This article organizes both: what kinds of rules are available, and the best times to run them.
Benefits of using ESLint
Using ESLint has several practical benefits.
Catch signs of bugs early
It can flag unused variables, unreachable code, and other patterns that often lead to runtime errors while you are still writing code.
Keep code reviews focused on what matters
By letting ESLint handle style issues and careless mistakes, code reviews can spend more time on logic and design.
Keep code style consistent across the team and reduce conflicts
Consistent code style reduces unnecessary diffs and helps cut down on merge conflicts and review noise caused by differences in how people write code.
What ESLint can catch
Here are some representative examples of the kinds of issues ESLint rules can detect.
Code that may lead to bugs
Common examples include unused variables, undefined variables, unreachable code, and mistaken == versus === comparisons. Catching these early makes it much easier to prevent bugs before they ship.
| Rule | What it does |
|---|---|
no-unused-vars |
Detects unused variables. Makes it easier to spot dead code or unfinished implementation |
no-undef |
Detects references to undefined variables. Helps prevent runtime errors before they happen |
no-unreachable |
Detects code that will never run, such as code after a return. Makes unintended code easier to spot |
eqeqeq |
Disallows ==. Helps prevent unintended comparisons caused by type coercion |
Note: In TypeScript files, no-undef often overlaps with the TypeScript compiler, so it is usually turned off. For unused-variable checks, typescript-eslint also recommends turning ESLint’s built-in no-unused-vars off and using @typescript-eslint/no-unused-vars instead because it understands TypeScript syntax.
Readability and maintainability issues
You can also enforce rules around overly complex structures, deep nesting, inconsistent code style, magic numbers, and messy import ordering. This improves long-term maintainability and reduces style-related conflicts that are common in team development.
| Rule | What it does |
|---|---|
complexity |
Sets an upper limit on function complexity. Helps keep implementations from becoming too complex |
max-depth |
Limits nesting depth. Helps prevent hard-to-read nested structures |
sort-imports |
Sorts members inside {} alphabetically, such as import { b, a } |
max-lines-per-function |
Sets a limit on the number of lines in a function. Helps prevent a single function from growing too large |
Each rule can be assigned one of three severities: off (disabled), warn (report only and continue), or error (fail CI or block a commit). A practical approach is to treat bug-related rules as error, code-style rules as warn, and unnecessary rules as off, so it is clear which problems should stop the workflow and which should simply be surfaced.
Framework- and language-specific rules
TypeScript-specific checks and framework-specific plugins can cover issues that the standard rules alone often miss.
- TypeScript: typescript-eslint (parser and rule set for TypeScript)
- React: eslint-plugin-react and eslint-plugin-react-hooks (rules for JSX and Hooks)
- Vue.js: eslint-plugin-vue (rules and best practices for Vue single-file components. For Nuxt,
@nuxt/eslintis the official recommendation.) - Next.js: Configuration: ESLint (best practices for Next.js)
- Astro: ESLint (guidance for adding ESLint support to Astro projects)
Community plugins can also fill gaps that the built-in rules do not cover. One example is eslint-plugin-simple-import-sort, which automatically sorts import declarations. ESLint works best when it is treated as something you grow over time, adding and adjusting rules as the project evolves.
Install ESLint
In frameworks such as Next.js, Nuxt, and Astro, project-creation commands like create-next-app let you choose whether to include ESLint, and if you do, a config file is generated automatically. In that case, there is nothing extra to install; an eslint.config.* file and related setup are already in place.
In other projects, or if you skipped ESLint during setup, you can install it with the following command. For more details, see the official ESLint guide, “Getting Started with ESLint.”
npm init @eslint/config@latest
After running the command, you will be asked a few questions about your project. Choose the options that fit your setup.
Example output
Need to install the following packages:
@eslint/create-config@1.11.0
Ok to proceed? (y) y

> 260410_eslint@1.0.0 npx
> "create-config"

@eslint/create-config: v1.11.0

✔ What do you want to lint? · javascript
✔ How would you like to use ESLint? · problems
✔ What type of modules does your project use? · esm
✔ Which framework does your project use? · none
✔ Does your project use TypeScript? · No / Yes
✔ Where does your code run? · browser
✔ Which language do you want your configuration file be written in? · js
ℹ The config that you've selected requires the following dependencies:

eslint, @eslint/js, globals, typescript-eslint
✔ Would you like to install them now? · No / Yes
✔ Which package manager do you want to use? · npm
☕️Installing...
After installation, an eslint.config.* file is added and ESLint is ready to use.
.
├── eslint.config.mjs
├── package.json
└── package-lock.json
Add a lint script to package.json so you can run it easily.
{
  "scripts": {
    "lint": "eslint ."
  }
}
Target the right files for linting
When ESLint is added manually, it is easy to leave files or ignores unset in eslint.config.*. The same problem can happen after moving to a monorepo, when the linting scope changes. If that happens, linting may run on files you did not intend to check. Running it against build output or directories outside your actual target increases execution time and creates unnecessary warnings.
Defining included paths (files) and exclusions (ignores) first prevents ESLint from touching unintended files. For browser code, it is also a good idea to configure globals.browser so globals such as window and document are handled correctly.
// eslint.config.mjs
import globals from "globals";
import js from "@eslint/js";

export default [
  {
    ignores: [
      "**/node_modules/**",
      "**/dist/**",
      "**/build/**",
      "**/coverage/**",
      "**/.next/**",
      "**/*.generated.*",
    ],
  },
  {
    files: [
      "apps/web/**/*.{js,jsx,ts,tsx}",
      "packages/ui/**/*.{js,jsx,ts,tsx}",
    ],
    // Define browser globals to avoid false positives
    languageOptions: {
      globals: globals.browser,
    },
    ...js.configs.recommended,
  },
];
When should linting run?
It is worth deciding in advance when linting should run. If it is left to individual judgment, teams are more likely to miss runs, produce large diffs at unexpected times, and increase review overhead.
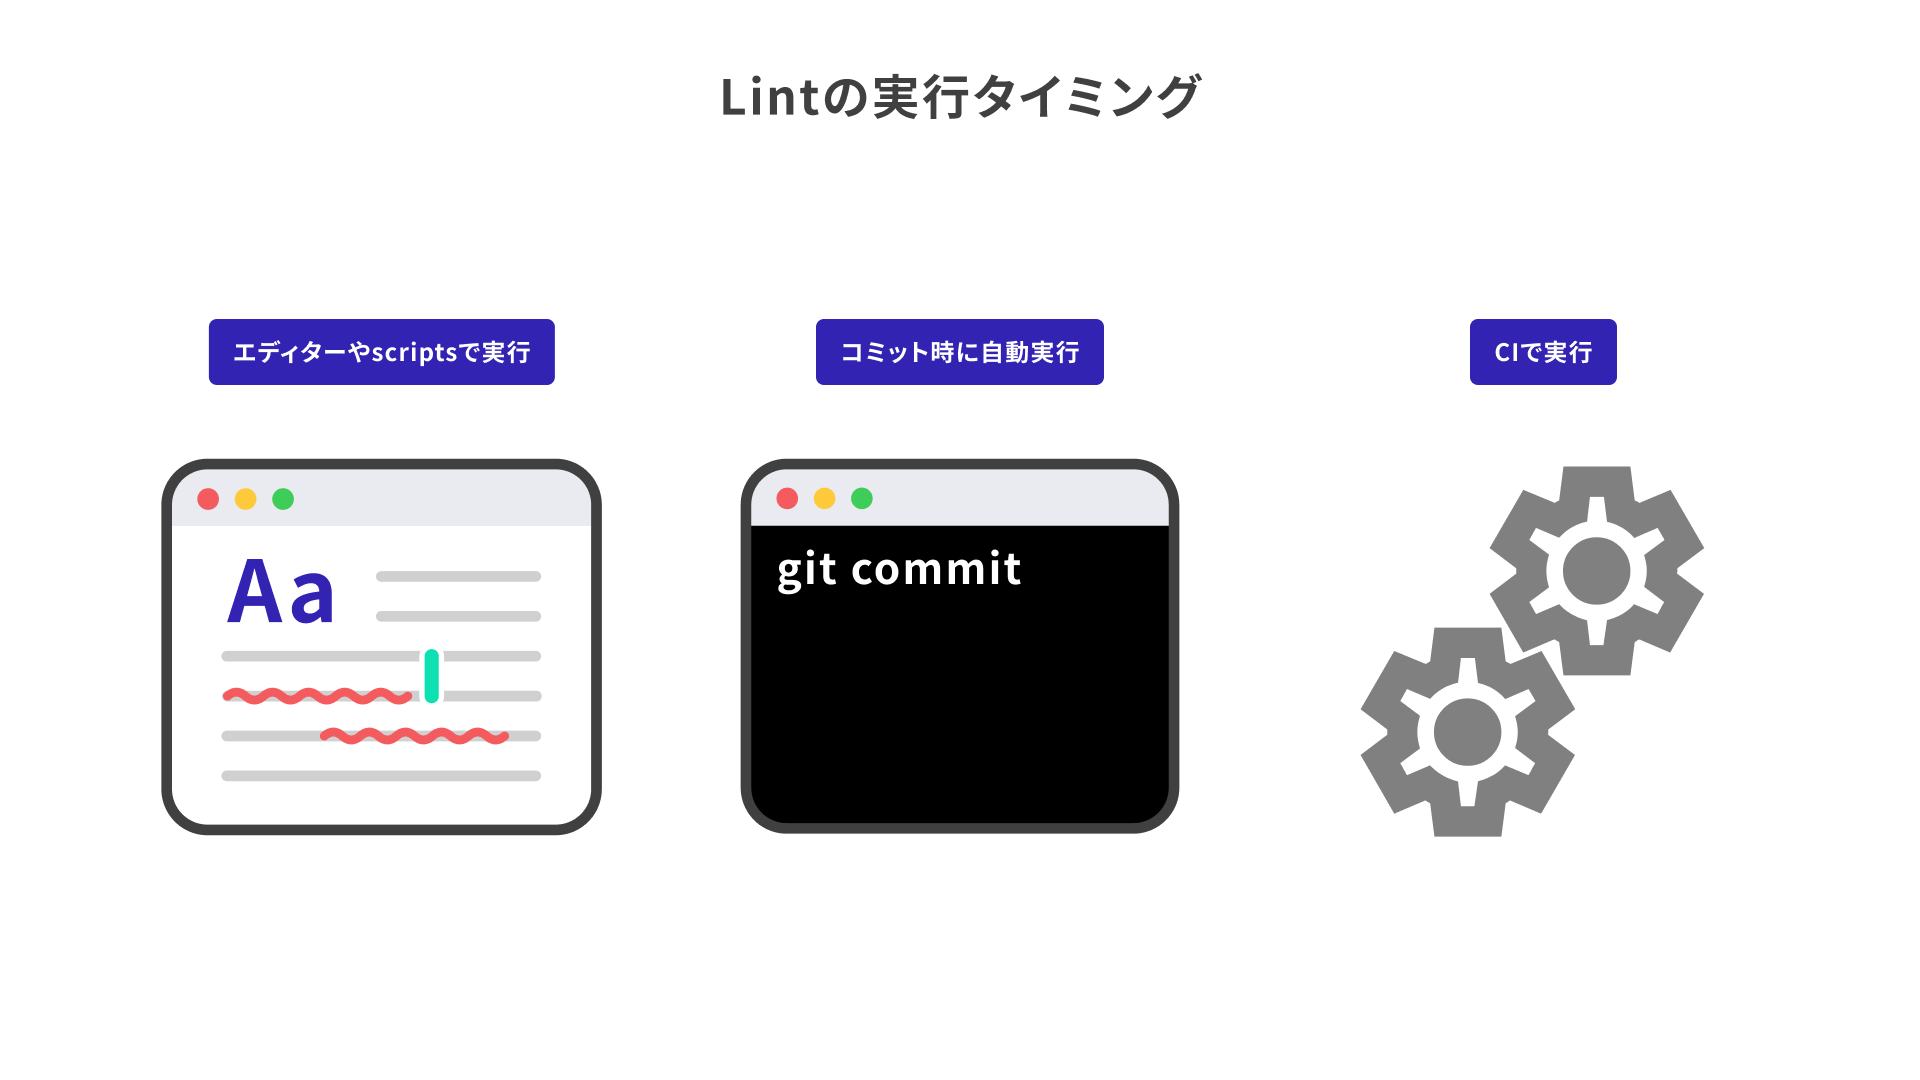
Run it in the editor
This means either using an editor extension to detect problems in real time, or running a command such as npm run lint manually. Depending on your settings, auto-fixes on save are also possible. The feedback loop is fast, but if it is left entirely to personal habits, runs can be missed, so it is safest to combine this with automatic checks at commit time or in CI.
In VS Code, installing the ESLint extension shows lint errors in real time. To auto-fix on save, add the following to settings.json.
{
  "editor.codeActionsOnSave": {
    "source.fixAll.eslint": "explicit"
  }
}
Run it at commit time
A common setup is husky, which makes Git hooks easy to configure, together with lint-staged, which runs linting only on files staged for commit. With this combination, linting runs automatically in Git’s pre-commit hook, which runs immediately before a commit, and the commit can be blocked if problems remain.
Because husky operates at the root of the Git repository, run all of the following commands from the repository root.
Install
npm install -D husky lint-staged
Initialize husky
Running the command below creates the .husky/ directory and a pre-commit file, and adds "prepare": "husky" to the scripts section of package.json.
npx husky init
Set up pre-commit
The generated .husky/pre-commit file runs npm test by default, so replace it with npx lint-staged.
npx lint-staged
Add the lint-staged configuration to package.json
Adjust the *.{js,ts} pattern so it matches the files configured in eslint.config.*.
{
  "lint-staged": {
    "*.{js,ts}": "eslint"
  }
}
Run it automatically in CI (continuous integration)
You can also run linting in CI when a pull request is opened or when code is pushed, and block merges when errors remain. Because this runs under the same conditions regardless of each person’s local environment, it can catch issues that slipped past editor or commit-time checks.
If you use GitHub Actions, add a workflow file like the following under .github/workflows/ at the project root. It is a good idea to run the same npm run lint command you use locally.
# .github/workflows/lint.yml
name: Lint
on:
  push:
    branches: [main]
  pull_request:
jobs:
  lint:
    runs-on: ubuntu-latest
    steps:
      - uses: actions/checkout@v4
      - uses: actions/setup-node@v4
        with:
          node-version: 'lts/*'
      - run: npm ci
      - run: npm run lint
Column: auto-fixing with --fix
When linting runs in the editor, at commit time, or in CI, some rules can be fixed automatically with the --fix option. It is worth using this proactively because it reduces the amount of manual cleanup.
That said, formatting-oriented rules were deprecated in ESLint core in 2023, so the recommended approach today is to use a dedicated formatter such as Prettier or dprint, or ESLint Stylistic (@stylistic/*). For a guide to setting up Prettier, see the article “Prettierの導入方法.”
| Rule | What it does |
|---|---|
@stylistic/semi |
Standardizes whether semicolons are used |
@stylistic/quotes |
Standardizes quote style. Helps reduce noisy diffs |
@stylistic/comma-dangle |
Standardizes trailing-comma rules. Can keep diffs smaller when lines are added or removed |
@stylistic/object-curly-spacing |
Standardizes spacing inside object braces |
Options for faster linting
So far, this article has focused on organizing an ESLint-based workflow. If you want faster execution, one option worth considering is Oxlint.
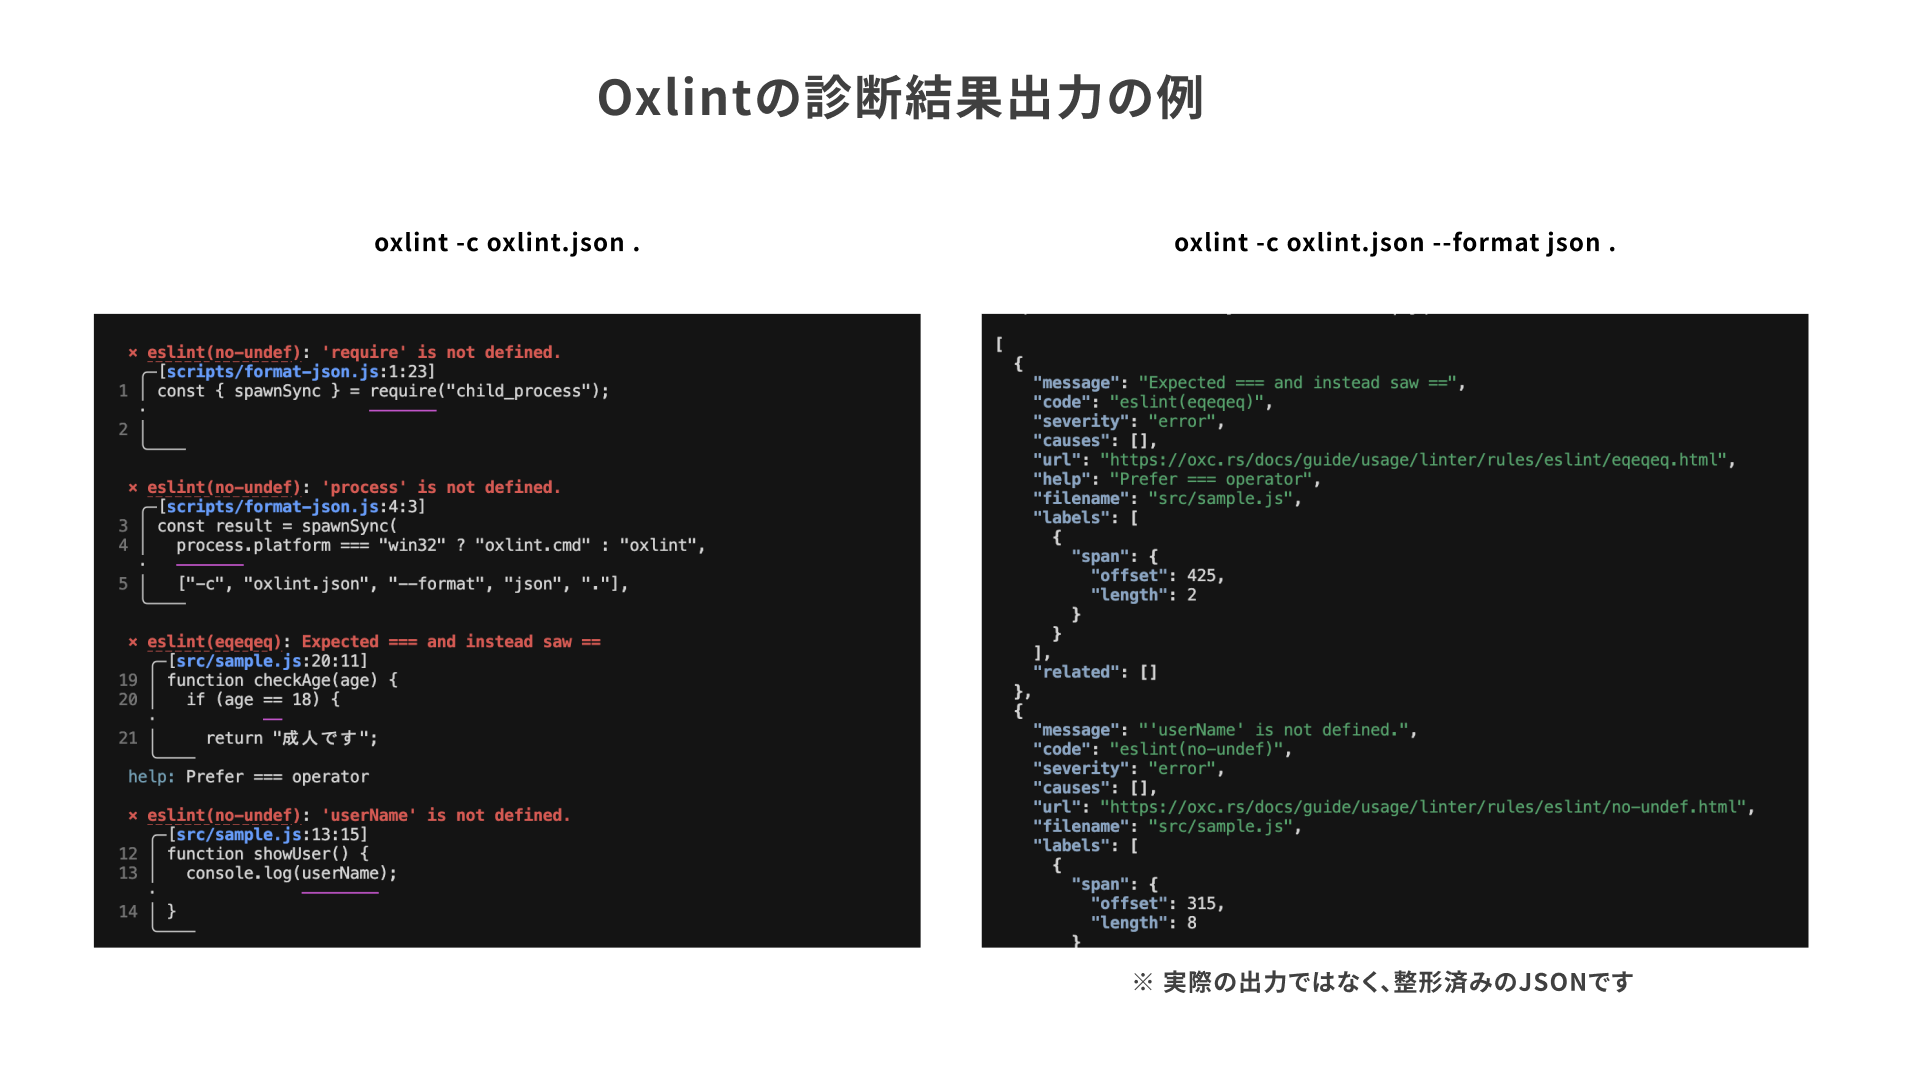
Oxlint is an ESLint-compatible, high-performance linter that is said to run up to 50 to 100 times faster than ESLint. By default, its diagnostics are easy to read, showing both a code snippet around the problem and a suggested fix. It also supports JSON output, which makes it a good fit for AI-assisted auto-fixing workflows.
If you already use ESLint in a repository, there are also ways to run Oxlint alongside it. A gradual migration, moving rules from ESLint to Oxlint in stages, is often a practical approach. eslint-plugin-oxlint automatically disables ESLint rules that overlap with Oxlint, which helps keep dual setups clean. Following the official migration guide makes the transition smooth for most projects.
Conclusion
ESLint is most effective not when it is merely installed, but when the team is clear about what each rule is meant to prevent and uses it accordingly.
Separating the roles of editor checks, commit-time checks, and CI makes it easier to reduce review dependence and rework.
The key to maintaining code quality is to share decision criteria across the team and manage rules deliberately.
Other options are also gaining attention, including Biome, which integrates formatting and linting, and the combination of Oxfmt, the formatter from Oxc, with Oxlint. For more details, see the article “手軽で高速なフォーマッターBiomeの導入手順” and Vite guide - HTML, TypeScript, React, Vue, and Tailwind CSS, which also introduces Oxlint and Oxfmt.