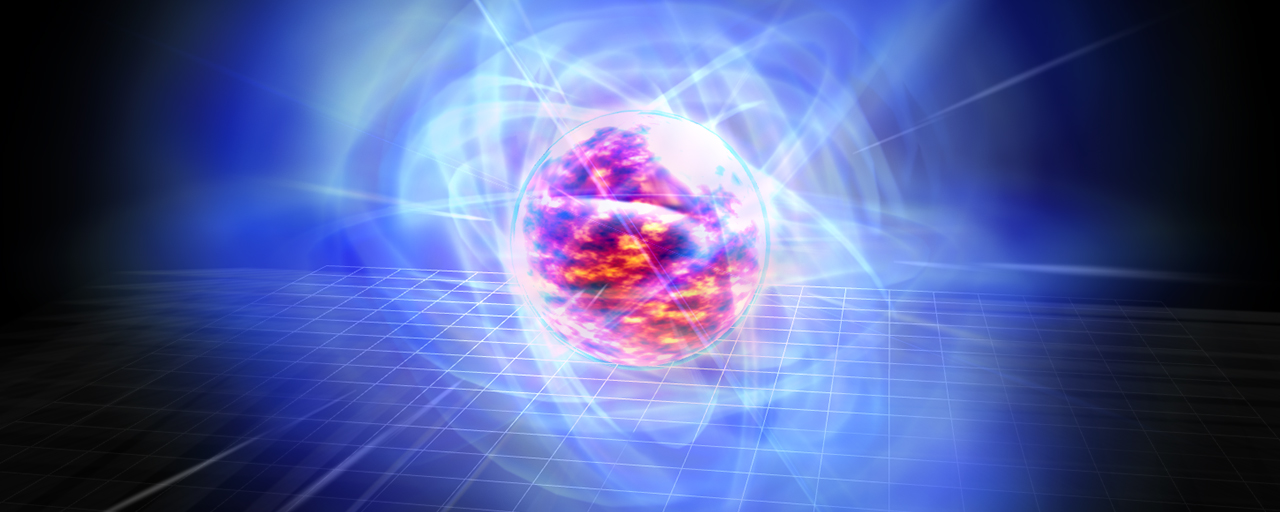
Web content for games and visualizations often needs memorable 3D effects, and JavaScript with Three.js is a practical way to build them. In this series, we walk through the process of creating 3D effects with Three.js, one of the standard 3D libraries for the web.
This installment focuses on a magma effect. This theme was previously covered in Effekseer, a 3D effect authoring tool, in the article “エフェクト作成入門講座 Effekseer編 UVスクロールを使ったマグマエフェクトの作成”. Because Effekseer is a design tool rather than a programming library, its workflow is completely different from building the effect in Three.js. Even so, the core ideas behind the visual result remain the same. Once the implementation principles are understood, the same look can be recreated with a different tool or workflow.
This article breaks the effect down into simple JavaScript and TSL code so it can be followed step by step without feeling intimidating. The sample code is available on GitHub, so keep it open as a reference while you read.
This demo was built with Three.js (r183 / WebGPU), TypeScript (v6.0), and Vite. For setup instructions, see the article Getting started with Three.js on WebGPU. You can toggle each part on and off individually from the inspector in the top-right corner, which makes it easier to compare the demo with the explanations in this article.
Effect breakdown
As with the Effekseer version, this effect can be built from six objects. The following sections explain the key ideas used in each part.
- Magma sphere
- Aura sphere
- Outer glow
- Spark
- Inner glow
- Flare
Magma sphere and aura sphere
The magma sphere and aura sphere both use simple spherical meshes with textures applied to them. By scrolling the textures, the magma appears to flow and the aura appears to drift.
import magmaTextureUrl from "./assets/magma.png";

// Load the texture
const loader = new THREE.TextureLoader();
const map = loader.load(magmaTextureUrl);
map.colorSpace = THREE.SRGBColorSpace;
// Repeat settings for UV scrolling
map.wrapS = map.wrapT = THREE.RepeatWrapping;

// Apply it to a sphere with radius 2
const mesh = new THREE.Mesh(
  new THREE.SphereGeometry(2, 40, 40),
  new THREE.MeshBasicMaterial({ map }),
);
Next, add code to scroll the texture over time. Put this inside a function that runs every frame, such as one driven by requestAnimationFrame().
// UV offset based on elapsed time
// performance.now() returns elapsed time in milliseconds
// Convert it to seconds and use different speeds for X and Y
map.offset.x = performance.now() / 1000 / 2;
map.offset.y = performance.now() / 1000 / 2.5;
This creates the animation of the texture drifting over the surface. Texture animation of this kind is commonly called UV animation. The aura sphere works the same way: its radius is slightly larger at 2.02, it uses an additive transparent material, and its UVs scroll in the opposite direction.
Outer glow
The outer glow is created with a textured billboard. A billboard is a flat plane that always faces the camera. In Three.js, billboards are implemented with THREE.Sprite.
import particleTextureUrl from "./assets/Particle01.png";

// Load the glow texture
const loader = new THREE.TextureLoader();
const map = loader.load(particleTextureUrl);
map.colorSpace = THREE.SRGBColorSpace;

// Material for the billboard
const material = new THREE.SpriteMaterial({
  map: map,
  // No tint
  color: 0xffffff,
  // Additive blending for a luminous look
  blending: THREE.AdditiveBlending,
  // Slight transparency
  opacity: 0.8,
  transparent: true,
});

// A glowing billboard that always faces the camera
const sprite = new THREE.Sprite(material);
That is enough to create the billboard, but the default size is extremely small, so make sure to scale it up to an appropriate size.
// Scale it up so it covers the whole effect
sprite.scale.multiplyScalar(11);
Spark
The sparks are reproduced by placing many thin rectangular Mesh objects and recycling them as they flow downward. The following code shows the key ideas for a single spark.
import sparkTextureUrl from "./assets/Burst01.png";

// Load the streak texture
const loader = new THREE.TextureLoader();
const map = loader.load(sparkTextureUrl);
map.colorSpace = THREE.SRGBColorSpace;
// UV repeat settings
map.wrapS = map.wrapT = THREE.RepeatWrapping;

// Additive glowing material
const material = new THREE.MeshBasicMaterial({
  map,
  transparent: true,
  // Render both sides
  side: THREE.DoubleSide,
  // Reduce sorting artifacts between transparent surfaces
  depthWrite: false,
  blending: THREE.AdditiveBlending,
  // Initial opacity
  opacity: 0.5,
});

// One spark
const mesh = new THREE.Mesh(new THREE.PlaneGeometry(0.1, 2), material);
// Randomize the starting position
mesh.position.y = Math.random() * 5;
// Randomize the orientation as well
mesh.rotation.y = Math.random() * 2;
Note: The code above is simplified for clarity.
In the animation code, the key point is that movement is corrected using the time difference from the previous frame, so the perceived speed stays consistent even when the frame rate changes.
// Speed for this spark
const speed = Math.random() * 0.2 + 0.1;
// Time of the previous update
let previousTime = 0;

const update = () => {
  // Time elapsed since the previous frame
  const delta = performance.now() - previousTime;
  // Speed multiplier based on 16 ms
  const speedRatio = delta / 16;

  // Fade out gradually
  material.opacity -= 0.01 * speedRatio;
  // Move downward
  mesh.position.y -= speed * speedRatio;

  // Reuse it by moving it back to the top once it disappears
  if (mesh.position.y < 0 || material.opacity < 0) {
    mesh.position.y = 8;
    material.opacity = 0.5;
  }

  // Store the current time for the next frame
  previousTime = performance.now();
};
That covers the behavior for a single spark. The rest is simply duplicating the spark around the sphere with different rotations. Slight random variation in the start positions and orientations helps the result look more natural instead of overly uniform.
From here on, the remaining parts use TSL. TSL (Three.js Shading Language) is a syntax for building shader logic for node-based materials in Three.js. Instead of writing GLSL directly as strings, operations such as dot products, UV calculations, and opacity control can be described in TypeScript.
Inner glow
The inner glow is created by applying a gradient to a sphere Mesh with TSL. The key is to compute an opacity that becomes stronger near the rim of the sphere based on the relationship between the normal and the view direction.
The following code is the important part.
import { MeshBasicNodeMaterial } from "three/webgpu";
import { color, normalView, positionViewDirection, vec4 } from "three/tsl";

// Node-based material
const material = new MeshBasicNodeMaterial({
  // Draw only the front faces
  side: THREE.FrontSide,
  // Additive blending
  blending: THREE.AdditiveBlending,
  transparent: true,
});

// Dot product of the normal and the view direction
// 1 when facing the camera, 0 near the silhouette
const alphaNode = normalView
  .dot(positionViewDirection)
  // Clamp to the 0 to 1 range
  .clamp()
  // Invert it so the rim becomes stronger
  .oneMinus()
  // Adjust the intensity
  .mul(0.55);

// Light blue + computed alpha
material.colorNode = vec4(color(0x96ecff), alphaNode);
normalView.dot(positionViewDirection) represents how closely the surface direction matches the view direction. By inverting it with oneMinus(), the glow becomes stronger near the silhouette than on the parts that face the camera directly.
Flare
The flare is built by layering multiple ring-shaped glowing bands that sweep across the sphere. The key point is to build the ring BufferGeometry manually and then use TSL to define the look.
First, generate a thin ring surface by placing vertices from radius 2 to 6.
// Outer radius
const OUTER_RADIUS = 6;
// Inner radius
const INNER_RADIUS = 2;
// Number of segments around the circle
const radialSegments = 30;
// Number of segments across the width
const widthSegments = 3;
// Vertex positions
const positions: number[] = [];
// UV coordinates
const uvs: number[] = [];

// Generate vertices while changing the radius across the width
for (let y = 0; y <= widthSegments; y++) {
  // Ratio from 0 to 1
  const v = y / widthSegments;
  // Interpolate from inner to outer radius
  const radius = INNER_RADIUS + (OUTER_RADIUS - INNER_RADIUS) * v;

  // Place one full ring of vertices around the circumference
  for (let x = 0; x <= radialSegments; x++) {
    const u = x / radialSegments;
    // Convert to an angle
    const theta = u * Math.PI * 2;
    // Convert polar coordinates to XZ coordinates
    positions.push(Math.cos(theta) * radius, 0, Math.sin(theta) * radius);
    // Store the matching UV coordinates
    uvs.push(u, v);
  }
}
On the material side, combine UV scrolling of the texture with an opacity pattern that glows most strongly at the center of the band.
import { MeshBasicNodeMaterial } from "three/webgpu";
import { PI, float, texture, uniform, uv, vec3, vec4 } from "three/tsl";

// UV offset updated every frame
const offsetNode = uniform(offset);
// Sample the texture with the offset applied
const textureNode = texture(map, uv().add(offsetNode));
// Gradient that boosts only the center of the band
const radialFadeNode = uv().y.mul(PI).sin().clamp().mul(float(0.15));

// Add blue to adjust the emissive color
material.colorNode = vec4(
  textureNode.rgb.add(vec3(0.0, 0.0, 0.3)),
  float(1.0),
);
// Combine it with the texture alpha
material.opacityNode = textureNode.a.add(float(1.0)).mul(radialFadeNode);
uv().y.mul(PI).sin() creates a gradient where the inside and outside of the band fade out and only the center glows strongly. Combining that with textureNode.a gives the flare a textured pattern.
After that, update offset every frame to scroll the UVs and layer multiple flares with different rotations. To keep the flares stably layered in front, also set depthTest: false, depthWrite: false, and renderOrder = 20.
As with the sparks, duplicate a single flare several times and rotate each copy slightly differently. That produces a result like this.
Conclusion
This article introduced one way to build a magma effect in Three.js using a completely different technology stack from Effekseer. Even when using TSL and NodeMaterial, the core principles remain the same: scroll UVs, layer additive glow, and emphasize only the rim where needed.
ICS MEDIA has many more examples built with Three.js. Be sure to check out the related articles as well.